Guidebook - New Routes / Corrections to 6 - 8th Editions
The 8th Edition of the Arthur's Pass Mountaineering Guidebook became available in the first quarter of 2020. Some new routes didn't quite make it to this edition as it went to print. Visit the Mountain WIKI for a comprehensive, up to date, list of routes.
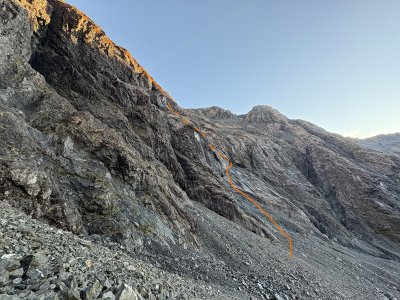
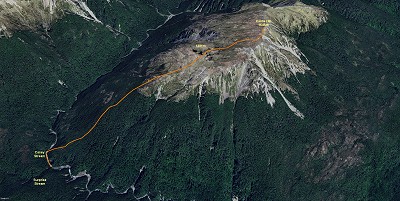
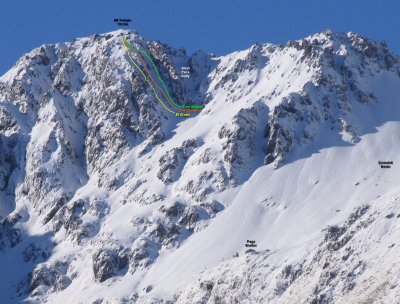
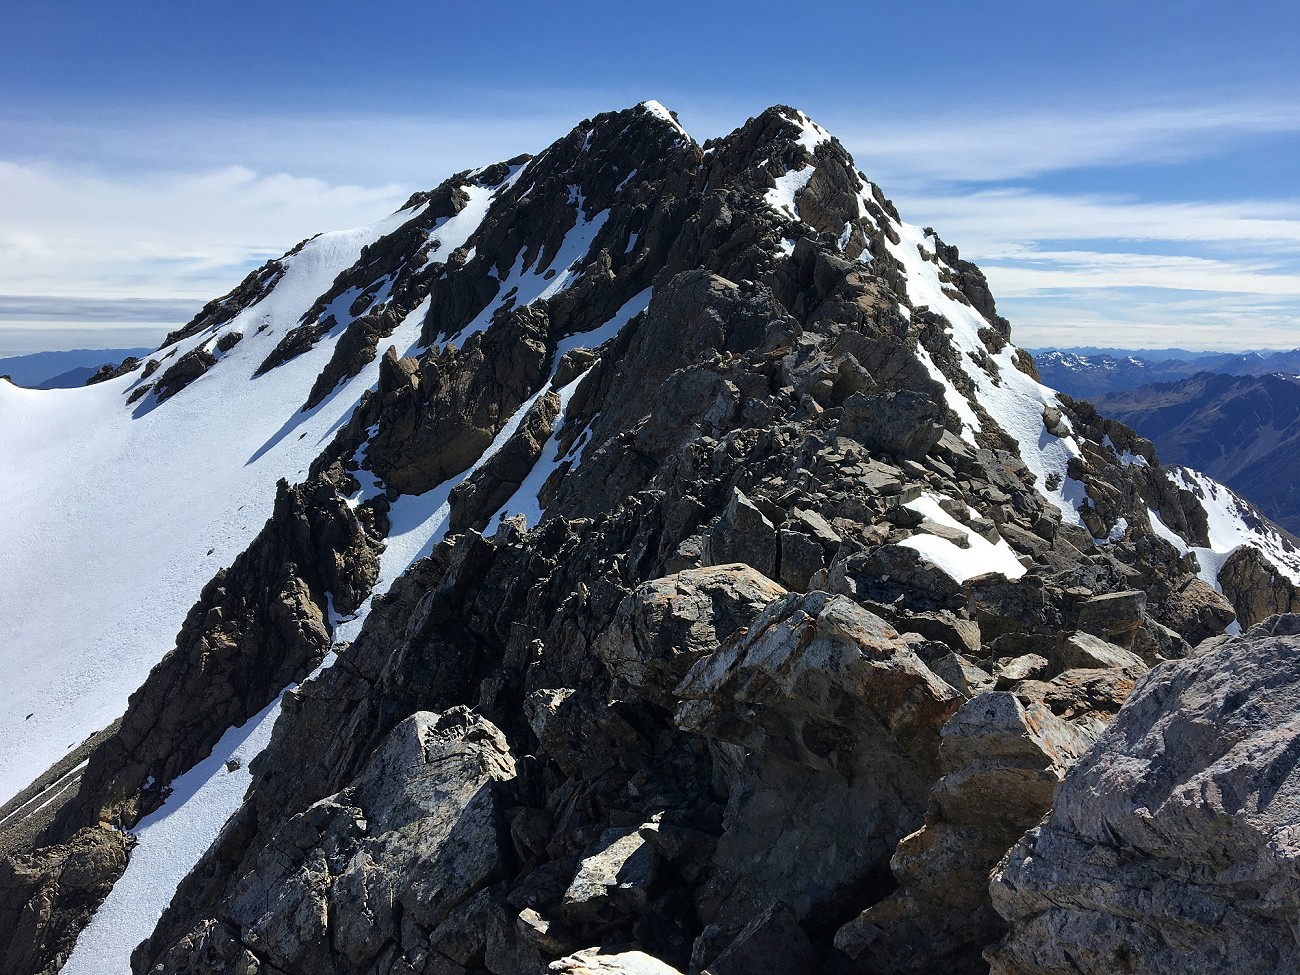
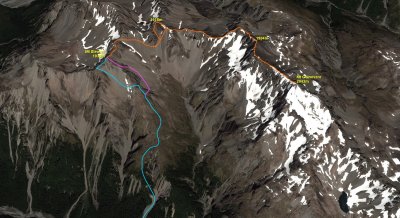
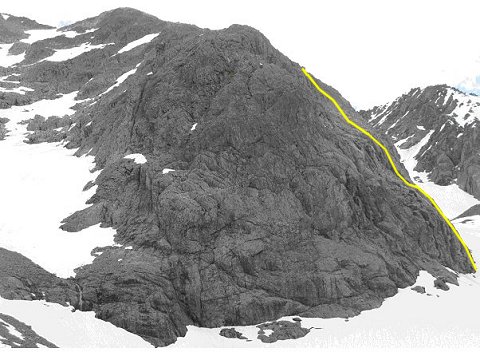
Mt Russel (1868m) - East Face 300m (The Last Bush Ranger)
NZAC Grade 3 Seriousness III (summer)
Ewbank Grade 10-13
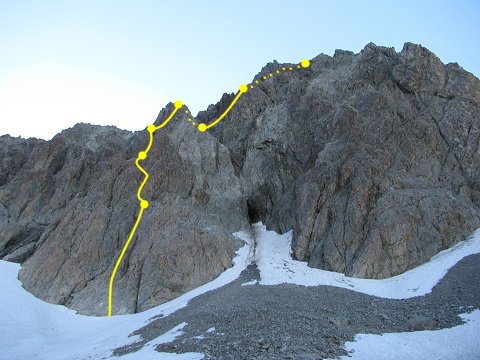
Aim for the northern corner at the base of the east face and scramble low angle slabs to the bottom of a gut between Mt Russel and its north east outlier. Climb left out of the gut to gain broader slabs and trend straight up, passing a small overlap on the left via a slab with thin moves (first crux). Ascend more easy slabs to where the rock steepens before trending right via a vague ledge system and the second crux before the angle eases off again. Ascend the remaining slabs directly to the summit. Crux sections around Ewbank grade 12-13 with the remainder of the route mostly grade 10. Generally sufficient protection but you have to work to find it.
Descend Mt Russel via the west ridge to approximately halfway between Mt Russel and pt1689 to low point on the ridge. Descend south via scree and ledges back to scree field south west of Mt Russel.
Access - Best approached via Good Luck Creek route out of the Deception River. Cross Mt Franklin west ridge at accessible low points, then under or on the Aicken Range towards Mt Russel.
First ascent Keeley Rhynd & Ryan Nicol 25 May 2026
NZAC Grade 3 Seriousness III (summer)
Ewbank Grade 10-13
Aim for the northern corner at the base of the east face and scramble low angle slabs to the bottom of a gut between Mt Russel and its north east outlier. Climb left out of the gut to gain broader slabs and trend straight up, passing a small overlap on the left via a slab with thin moves (first crux). Ascend more easy slabs to where the rock steepens before trending right via a vague ledge system and the second crux before the angle eases off again. Ascend the remaining slabs directly to the summit. Crux sections around Ewbank grade 12-13 with the remainder of the route mostly grade 10. Generally sufficient protection but you have to work to find it.
Descend Mt Russel via the west ridge to approximately halfway between Mt Russel and pt1689 to low point on the ridge. Descend south via scree and ledges back to scree field south west of Mt Russel.
Access - Best approached via Good Luck Creek route out of the Deception River. Cross Mt Franklin west ridge at accessible low points, then under or on the Aicken Range towards Mt Russel.
First ascent Keeley Rhynd & Ryan Nicol 25 May 2026
Mt Russel - East Face route (The Last Bush Ranger)
Mt Russel - East Face route (The Last Bush Ranger)
Photo - Ryan Nicol
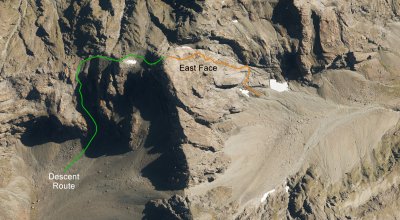
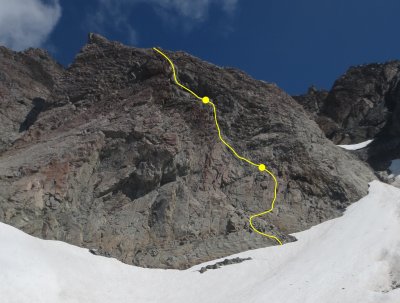
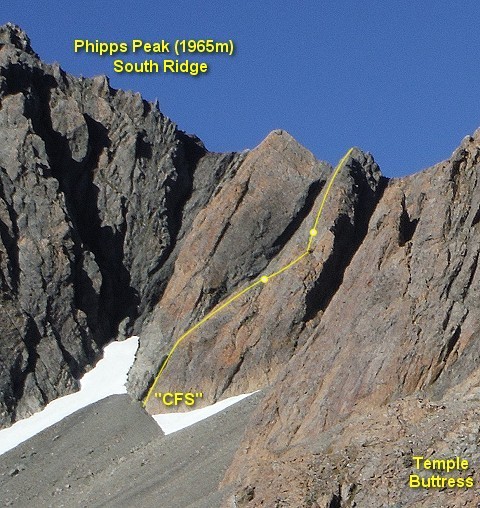
Phipps Peak (1965m) - East Face
NZAC Grade 2 Seriousness III
Summer route only due to avalanche risk.
Best access is via a sidle traverse of Mt Temple (1913m) by descending NE slopes from near the summit, or by sidling NNE from Temple Col down through the 1775m col separating the head of the Mingha from the Deception catchments.
Sidle talus slopes under Mt Temple northwards, then ascend onto the East Face of Phipps Peak, northward up through two bands of straightforward bluffs climbing about 100m. At about 1800m, ascend west up through more talus slopes. The third bluff band (crux) is met at about 1860m which leads up onto the South Ridge of Phipps (a.k.a. Temple traverse), just below the summit rocks.
First ascent (?) Joe Nawalaniec January 30 2025
Phipps Peak - East Face route
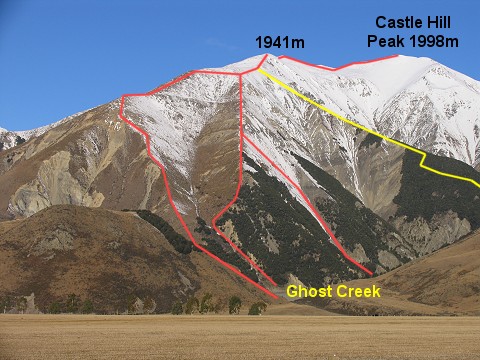
Castle Hill (1545m) - From Surprise / Casey Stream confluence
NZAC Grade 1 Seriousness II
Cross Casey Stream 300m upstream from its junction with Surprise Stream, then ascend the fern gully to the northeast onto a terrace. From there, follow intermittent animal trails straight up to the bush-line at around 1200m. The lack of game trails, and denseness of the scrub give as much a mental challenge as a physical one. Continue on to the tarns beside the 1391m point, then either follow the SE Ridge, or gentle SW slopes to the summit.
Jon Colbert September 29 2024
Castle Hill - Surprise/Casey Stream route
Correction : Route 3.09
Mt Speight (2116m) - Speight Buttress (left)NZAC Grade 5+ Seriousness IV (summer)
Ewbank Grade 18
Pitch 1 (25m, Grade 18) - Start a little to the right of the toe of the buttress, trending right as you ascend, while choosing the easiest-looking crack system. The rock on this pitch is excellent but flaring cracks mean it is marginally protectable; it may take some smaller cams & nuts. Steeper lines might offer better protection. Belay from the ledge at the top of the pitch - cams are useful as options for protection exist but are limited.
Pitch 2 (50m, Grade 15) - The rock on this pitch is chossy. Angle up and back left above the ledge, following the obvious weakness in the face, then up. This pitch does not have many solid options for protection. Good belay options available at the top.
Pitch 3 (35m, Grade 16) - The rock on this pitch is good. Go straight up, bridging to avoid strenuous moves. This pitch is easily protectable with link cams, cams and nuts. An easy exit to the left avoids a small roof above and steep slab to the right.
Above this point it is an easy scramble to the ridge. At the top of the scramble, climb directly to the ridge, rather than taking a collapsing, loose gut on your left (which leads directly to the summit).
Lorraine Johns & Jovan Andric January 30 2016
Note: the other two buttresses are also under-graded in the guidebook, expect much tougher and exposed climbing!
Mt Speight - Speight Buttress (left) Photo - Lorraine Johns
Correction : Route 3.12
Mt Speight (2116m) - Speight Buttress (right)NZAC Grade 5+ Seriousness IV (summer)
Ewbank Grade 18
Pitch 1 (20m, Grade 18) - Start centre-right of the right-hand buttress toe. The first 20m is sparse on protection (micro wires and small nuts very handy), good quality rock.
Pitch 2 (40m, Grade 16) - This pitch has good protection available (cams, nuts, wires).
Pitch 3 (40m, Grade 14) - Good protection.
Pitch 4 (20m, Grade 14) - Good protection. Scramble to north ridge.
There are multiple options on buttress for other good climbs.
Andy Barrett & Craig Hosking March 29 2014
Note: the other two buttresses are also under-graded in the guidebook, expect much tougher and exposed climbing!
Mt Speight - Speight Buttress (right) Photo - Dave Hegan
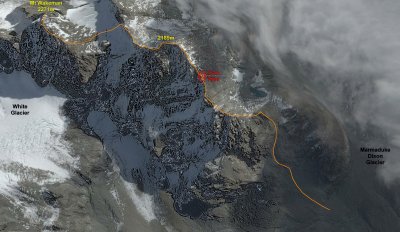
Mt Wakeman (2271m) - Northeast Ridge
NZAC Grade 3+ Seriousness IV (summer)
From Barker Hut commence heading towards the Marmaduke Dixon Glacier route, however stay to the left-hand side of the large rock buttress south of the glacier. Ascend the boulder strewn scree slope to its highest point at a gut running in from the left, scramble on slabs, up and initially leftwards, before climbing the centre of the face using good interconnecting slabs to join the northeast ridge at 2020m with a view towards the tarns northwest of the ridge. Continue to follow the ridge.
The section of ridge below the 2189m point is extremely narrow (only space for feet and hands) with considerable exposure on both sides. Several rotten pinnacles are met on this section of ridge, most can be climbed over, however the final pinnacle is not climbable. The solution is to drop down onto the north face of the ridge, sidling underneath the pinnacle via a network of crumbly catwalks/ledges and reascending 15m vertically back to the ridge; this is the most exposed part of the route. Continue scrambling to the 2189m point, following the ridge to join the standard Marmaduke Dixon Glacier route at a steep gully (usually ice) descending onto the ice-field north of the summit. Cross the ice-field, climbing onto the steep, loose northeast spur that ascends to the summit rocks.
First ascent (?) Dave Hegan 11 February 2024
Mt Wakeman - Northeast Ridge
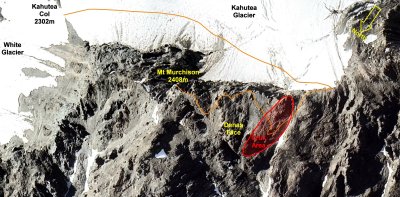
Mt Murchison (2408m) - Southwest Ridge, Denas Face
NZAC Grade 3 Seriousness IV (summer)
From Kahutea Col sidle the ice slopes of the Kahutea Glacier névé under Mt Murchison southwest for about 350m. This enters into a large bay of steep ice between rocky spurs. Ascend 60m to the top left-hand corner to gain the southwest ridge of Mt Murchison via a short, loose rock step. This route would likely be cut-off by bergschrunds in late summer.
The ridge has extensive rotten rock and numerous crumbling gendarmes that need to be avoided by descending north onto the very exposed and steep "Dennis Face". The initial foray onto to the face happens in the first 30m of ridge travel descending a steep gully of vertical bedded rock for about (20m), before sidling out on series of exposed narrow ledges to the nose of a steep rock spur, then reascending towards the ridge. Most travel takes place on the face (well below the crest of the SW ridge). The crux is met about 300m before the summit, and takes place on reliable, firm orange rock (soloable, Ewbank grade 11 - 14 for 30-40m laterally across the face, and 25m vertical, following cracks and ledges, with a couple of zigzags at the end to regain the SW ridge), and is the only solid patch of rock on the entire route. Finally scramble to the summit rocks of Murchison.
First ascent (?) Joe Nawalaniec 25 January 2024
Mt Murchison - Southwest Ridge
Mt Rosamond (2186m) - Northeast Ridge 846m
NZAC Grade 2+ Seriousness IV
From Ariels Tarns. Drop northwest down gullies into the stream and cross it, ascending the scree above onto a shoulder of the northeast ridge running to the 1809m point. Continuing on up the NE ridge, the first major obstacle is soon encountered where the ridge narrows to a pinch and is intersected by the vertical fault scrap. The resulting deep notch in the ridge is approx 2m wide, exposed and must be carefully navigated.
The final third of the NE ridge feature a couple of gendarmes that can be turned on the Whitehorn Pass side.
Once point 2059m is reached, drop onto Cronin Glacier to avoid the initial section of rocky obstacles before regaining the meandering SE ridge of Rosamond and following it to the summit. This involves making your way up through a very loose rock step halfway along the SE ridge.
Notes: Avalanches sweep the Whitehorn Pass and ice-field area in Winter/Spring. The notch on the ridge is very difficult to climb through, consider your options, and don't fall!
Dave Hegan 16 January 2024
Mt Rosamond - Northeast Ridge
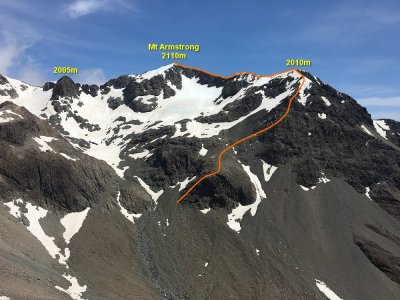
Mt Armstrong (2110m) - East Face 340m
NZAC Grade 2+ Seriousness II
From the head of the Rolleston River sidle north across the scree slopes on the true-left of the river to access the east face of Mt Armstrong. Towards the northeast corner of the face a large rock toe protrudes onto the scree and can be used as a starting point to climb up the face towards point 2010m directly above. The 500 metre long climb takes place on a mixture of good, solid rock and loose scree/rotten rock. Halfway up the face is a short but steep rock step that must be climbed. Once point 2010m is reached, follow the East Ridge all the way to the summit.
Dave Hegan 7 December 2022

Mt Armstrong - East Face
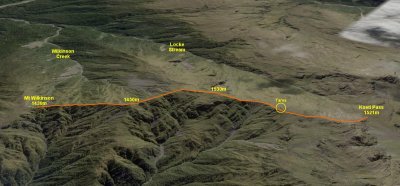
Mt Wilkinson (1430m) - From Koeti Pass
NZAC Grade 2 Seriousness II
Koeti Pass (1521m) can be reached via Locke Stream, the head of Minchin Stream, the upper west branch of Thompson Stream, or by traversing in from the various other passes (Minchin, Foy, Penny).
This route actually starts and travels over higher altitude terrain then the destination summit.
From Koeti Pass (1521m) travel is over easy ground, joining the ridge that climbs to the 1530m point. Water may be available from tiny tarns near the base of this ridge. From 1530m the ridge turns west descending to the 1450m point. From here the ridge narrows and steepens as it initially descends 100m before climbing again; a series of rock pinnacles can be bypassed on the Townsend Creek side via steep snow-grass, slips, and tussock. Ice-axe & crampons are recommended for any snow covered ascent as the terrain in this area is steep.
Notes:
- Route information provided by Nichola Hanson 8/10/2022
- No first ascents recorded.
Koeti Pass - Mt Wilkinson
Tainui Peak (1745m) - From Foy Pass
NZAC Grade 1 Seriousness I
This is quite a straightforward route. From Foy Pass (1365m) follow the broad snowgrass slopes to the northeast to the1498m point. From here head towards the more defined ridge over the 1725m point and towards the summit. From the 1725m point onward it gets rockier with slower travel, but it is not difficult or exposed.
To gain Foy Pass from the Taramakau Valley: From Locke Stream hut head downstream 450m and enter Locke Stream. Travel up the stream is straightforward. About 1.2km upstream a steep spur enters on the true-right, before the creek draining Foy Pass is met. Both this spur and the spur upstream of the same creek can be climbed to the broad Foy Pass.
Notes:
- Route information provided by Nichola Hanson 3/06/2022
- No first ascents recorded.
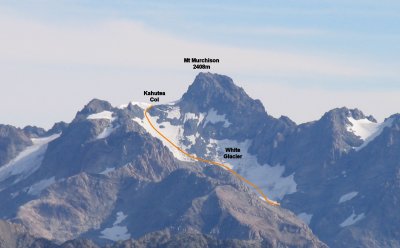
Mt Murchison (2408m) - White Glacier Route (2.14)
NZAC Grade 2 Seriousness II
In early 2022 Mt Murchison's northeast ridge collapsed onto the neve of the White Glacier. This has created very large and unstable moraine piles on the glacial surface. As the glacier is barely moving these days, being captive in it's rock basin, this debris field is not expected to disperse any time soon. Climbers should now move towards the centre of the glacier to avoid the rockpiles enroute to Kahutea Col.
Mt Murchison - White Glacier Route
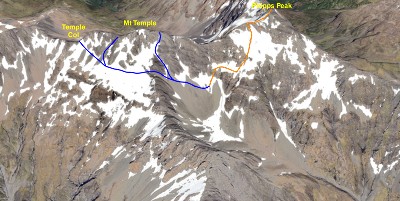
Mt Temple (1913m) - Three Amigos Routes
Winter routes only. The "Three Amigos" routes commence on the northern side of the West Face Gully route (normal descent route) where it begins to rise steeply.
Temple Buttress - "El Grupo" (150m)
NZAC Grade 2 Seriousness II (Winter)
This route is left-most of the three gully routes, starting on the right side of a steep, stepped rock buttress. Climb the ice gully through two pitches until easier ground is met. Climb the bouldered ramp towards the summit. Descent is via the western gully.
Described by Penny Webster, Julie Wagner July 11 July 2021
Temple Buttress - "Dos Duendes" (150m)
NZAC Grade 2+ Seriousness II (Winter)
This route is the middle of the three route gullies. It starts on the same snow-slope as "Tres Amigos" but stays on the left side of a rock rib met at the 80m point. Climb the ice gully through one pitch until a steep rock step is encountered. This step is about a grade 12 if rock, but would vary in technicality if ice covered. A second pitch above the step finds easier ground. Climb the bouldered ramp towards the summit. Descent is via the western gully.
Described by Penny Webster, Julie Wagner 3 July 2021
Temple Buttress - "Tres Amigos" (150m)
NZAC Grade 2 Seriousness II (Winter)
This route starts furthest to the right, adjacent to a massive rock buttress. Climb the ice gully through one pitch until below a head-wall of rock; traverse left over a rock rib on a final pitch to join easier ground above "Dos Duendes". Climb the bouldered ramp towards the summit. Descent is via the western gully.
Described by Julie Wagner, Penny Webster, Richard McGill, Robert Gallagher 10 June 2021
Notes:
- No first ascents recorded. The routes in this area have been used as ski descent gullies from the Mt Temple summit, in good snow and low avalanche years.
Mt Temple - Three Amigos Routes
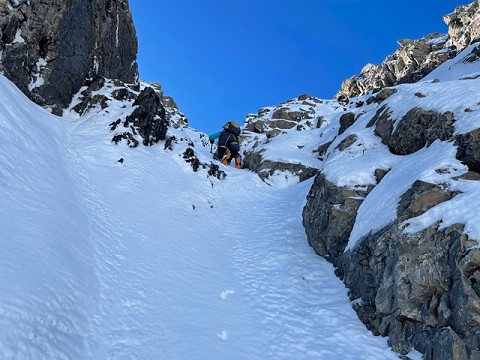
"El Grupo" at the crux.
Mt Gizeh (2162m) - Northeast Face
NZAC Grade 3 Seriousness III (Summer)
Access to the north-east face is easily gained via an obvious gully at the base of the face. From here follow a series of gullies and ledges, heading up diagonally to the climbers left, through very loose, shattered rock until you reach the summit ridge which can then can be traversed to the summit itself. Descend via Gizeh Col, or via the much steeper and looser Echo Col route.
Dave Hegan 6 February 2021
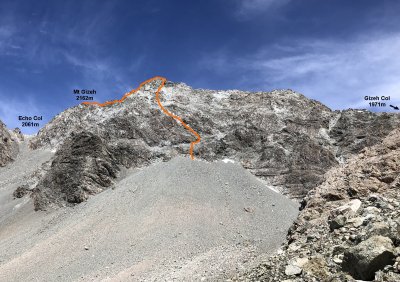
Mt Gizeh - Northeast Face
Mt Stuart (1906m) - South Ridge
NZAC Grade 3 Seriousness II
Commence ascending the west ridge of Phipps Peak from the Temple Basin goods lift, sidling around on the 1500m contour (using prominent fault scarps) onto the escarpment above the south branch of Pegleg Creek. A wide scree gut is met below the 1728m point and descended. Cross Pegleg Creek and ascend slopes towards the prominent rocky bluffs at the foot of the southern ridge. Make your way up through the rocky bluffs to gain the ridge. Follow the ridge to the summit.
The majority of the ridge consists of nice grippy orange rock which is enjoyable to climb but as you get closer to the summit the rock becomes very rotten in true Arthur's Pass tradition.
Surveyed by Dave Hegan 28 October 2020 (and quite a few times before that)
Note: It seems fairly obvious that route must of [?] been ascended in the distant past. If any body has information on its first ascent please get in contact.
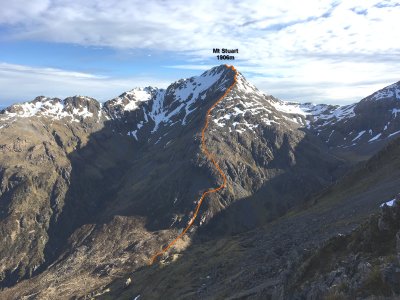
Mt Stuart - South Ridge
Mt Stuart - South Ridge
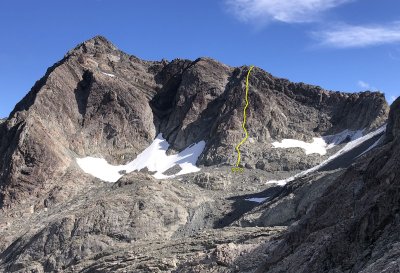
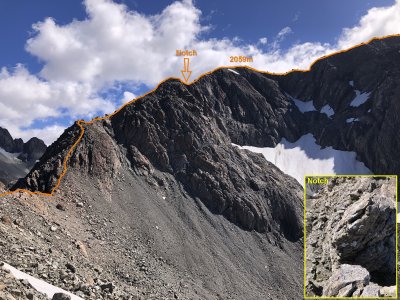
Phipps Peak (1965m) - South Ridge - "The Lost Line"
Ewbank Grade 15 (summer route only)
Start left of gully as for "CFS", solo up the easy terrain (grade 10-12) for 20-30m to gain a high belay. This would not be required if you wanted to have 3 full pitches...
Pitch 1: climb easy ground on slightly vegetated rock with very sparse protection (Grade 10-12). Once rock begins to get steeper (Grade 14-15), look out left to spy a lone rusty piton placed on a rather blank wall. Cross over to the piton (clip it if you like but preferably back it up if possible) and move underneath a slight buttress. The route becomes quite evident now with gear placements becoming easier to find. If pitching from the base possibly find a suitable anchor earlier for a belay, otherwise move through the first piton and find a suitable belay point higher on the climb.
Pitch 2: tend right for a couple meters to gain a slight arete. Again, there are some old pitons to guide you here. Follow the arete on good rock and protection for the rest of the climb. There are the remains of old slings halfway up this pitch. The pitch wanders slightly but is easy enough to just follow your nose.
Pitch 3: We ran out of rope about 10m below the summit of the buttress, but happily short roped it (grade 10 with good exposure) – bear this in mind. A rappel route was easy enough with a good rock spike on the summit to sling, have a look around for the second rappel station on descent, good slots do exist - two perfect 60m abseils. Alternatively descend via the normal route over Mt Temple.
An overall nice climb! Note – A lot of variations do exist on this face so definitely opportunity to choose your own adventure.
Gear: Standard rack of nuts, rack of cams (0.4, 0.5, 0.75, 1, 2, 3) double up in the bigger sizes, 2x 60m half ropes, webbing slings.
Mason Gardener & Liam Pyott 23/05/2020
Notes:
- The first ascent is not recorded; Old pitons & slings discovered on this route.
- Another similar line was climbed on this buttress in summer 1995 by Steve Eastwood and Shaun Campbell (Grade 15); no pitons were discovered on their route.

Phipps Peak - "The Lost Line"
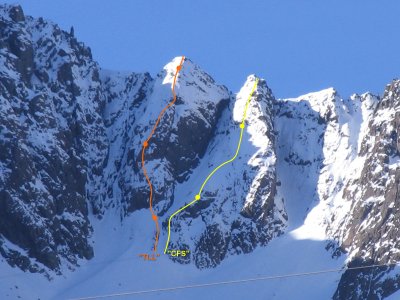
Phipps Peak - "The Lost Line"
Note: I'll replace this wintry route topo with a hi-res summer version, when summer comes - GK
Campbell Pass to Waimakariri River - Waterfall bypass route
Tramping route
If dropping in from Campbell Pass, follow the Campbell Creek to within 200 metres of the lip of the waterfall, climb to the east through low scrub and scree, turning north into an obvious scree gut. This climbs for 50m to a broad tussock area above the bluffs. Sweep around south to the top of the bluffs looking for easier vegetated slopes dropping through the bluffs and out onto the scree fan below, and the Waimak River beyond. An alternative route from just above the waterfall follows the base of the bluff to the east, southeast until a shoulder can be crossed back onto the vegetated slopes leading to the Waimak.
Going from the Waimak up onto Campbell Pass, continue north past the Campbell Creek junction for 270 metres, the most narrow section of the scrub should be here, push through, climb the scree northwest for about 400 metres, aiming for the vegetated, easier guts and gullies above, climb through to the broad tussock area above. Look for and descend the scree gut dropping south through the bluffs (Top E1474024, N5246097) back to Campbell Creek.
Surveyed by Greg Duley 16 August 2020
Note: This route supercedes the route documented after the 1994 earthquake destroyed the original waterfall route!
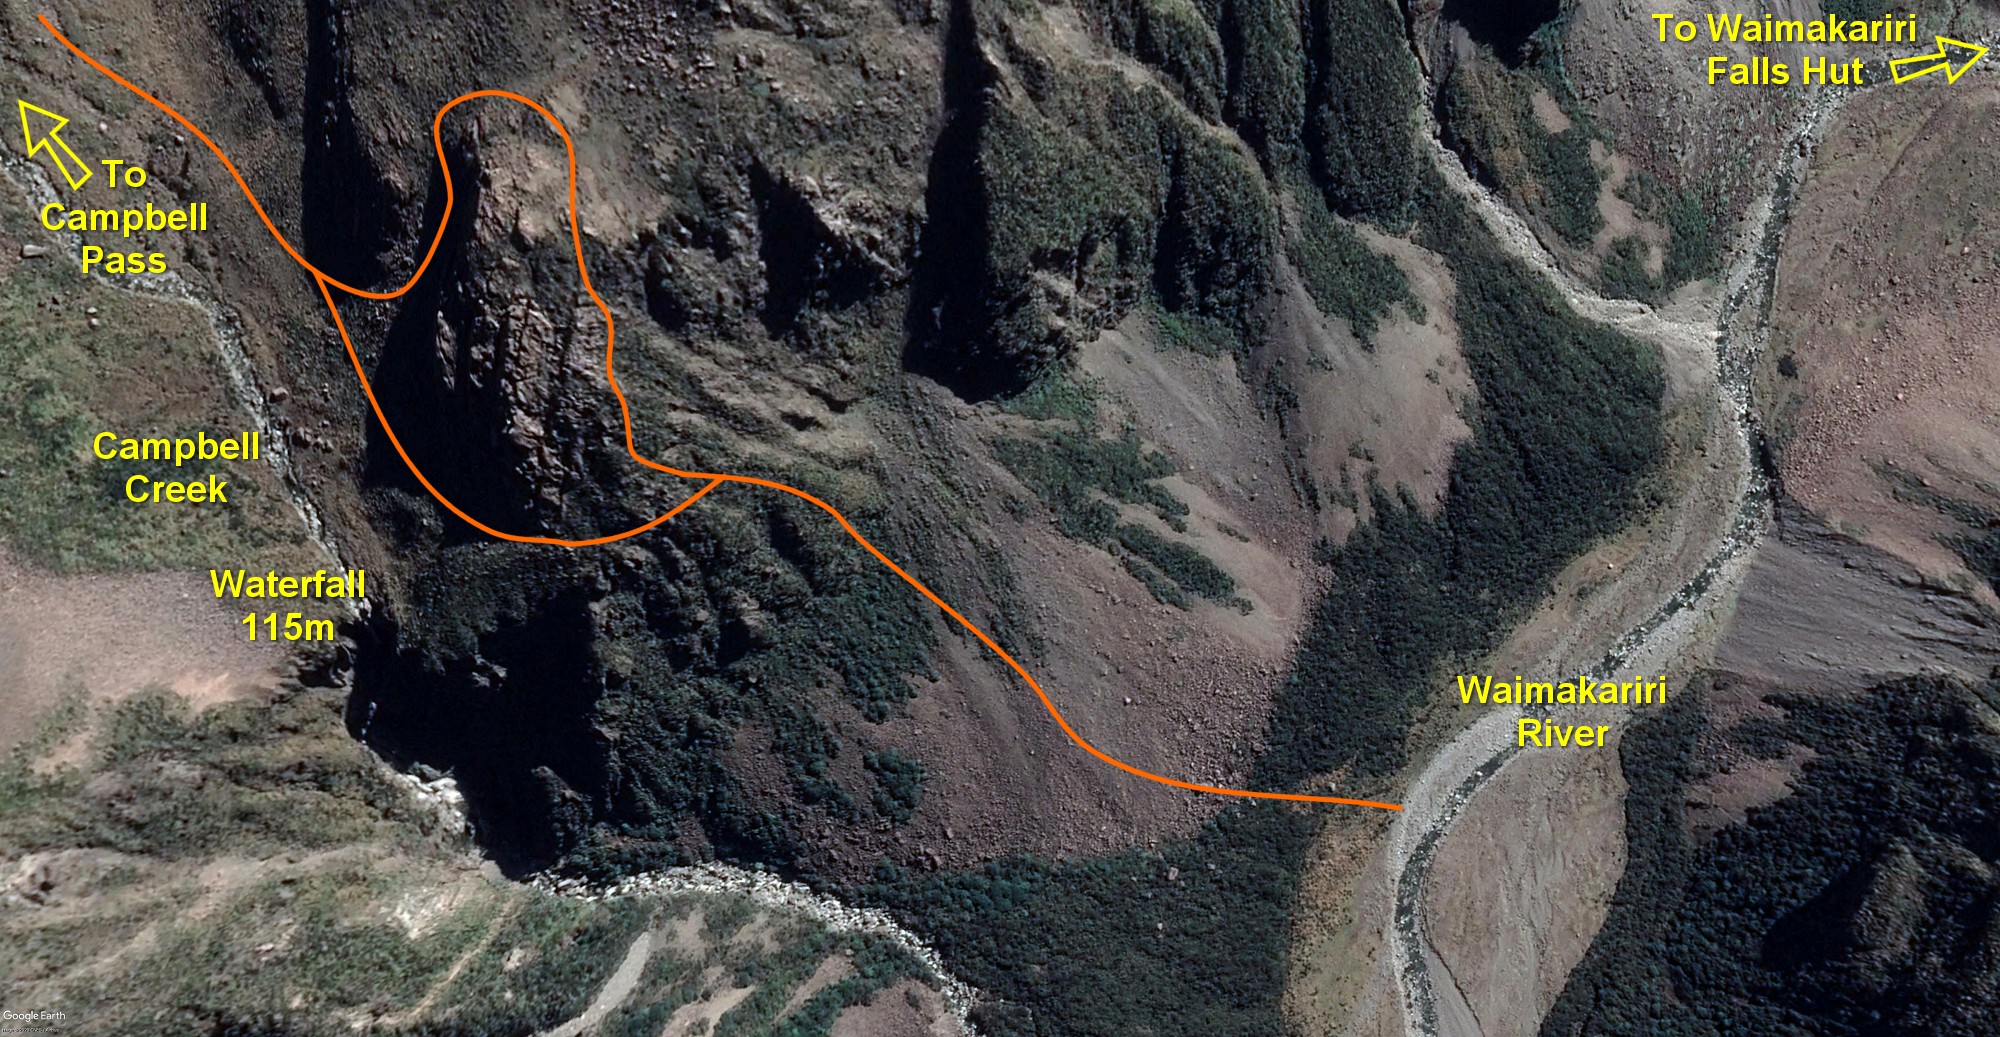
Campbell Pass - Waimakariri River
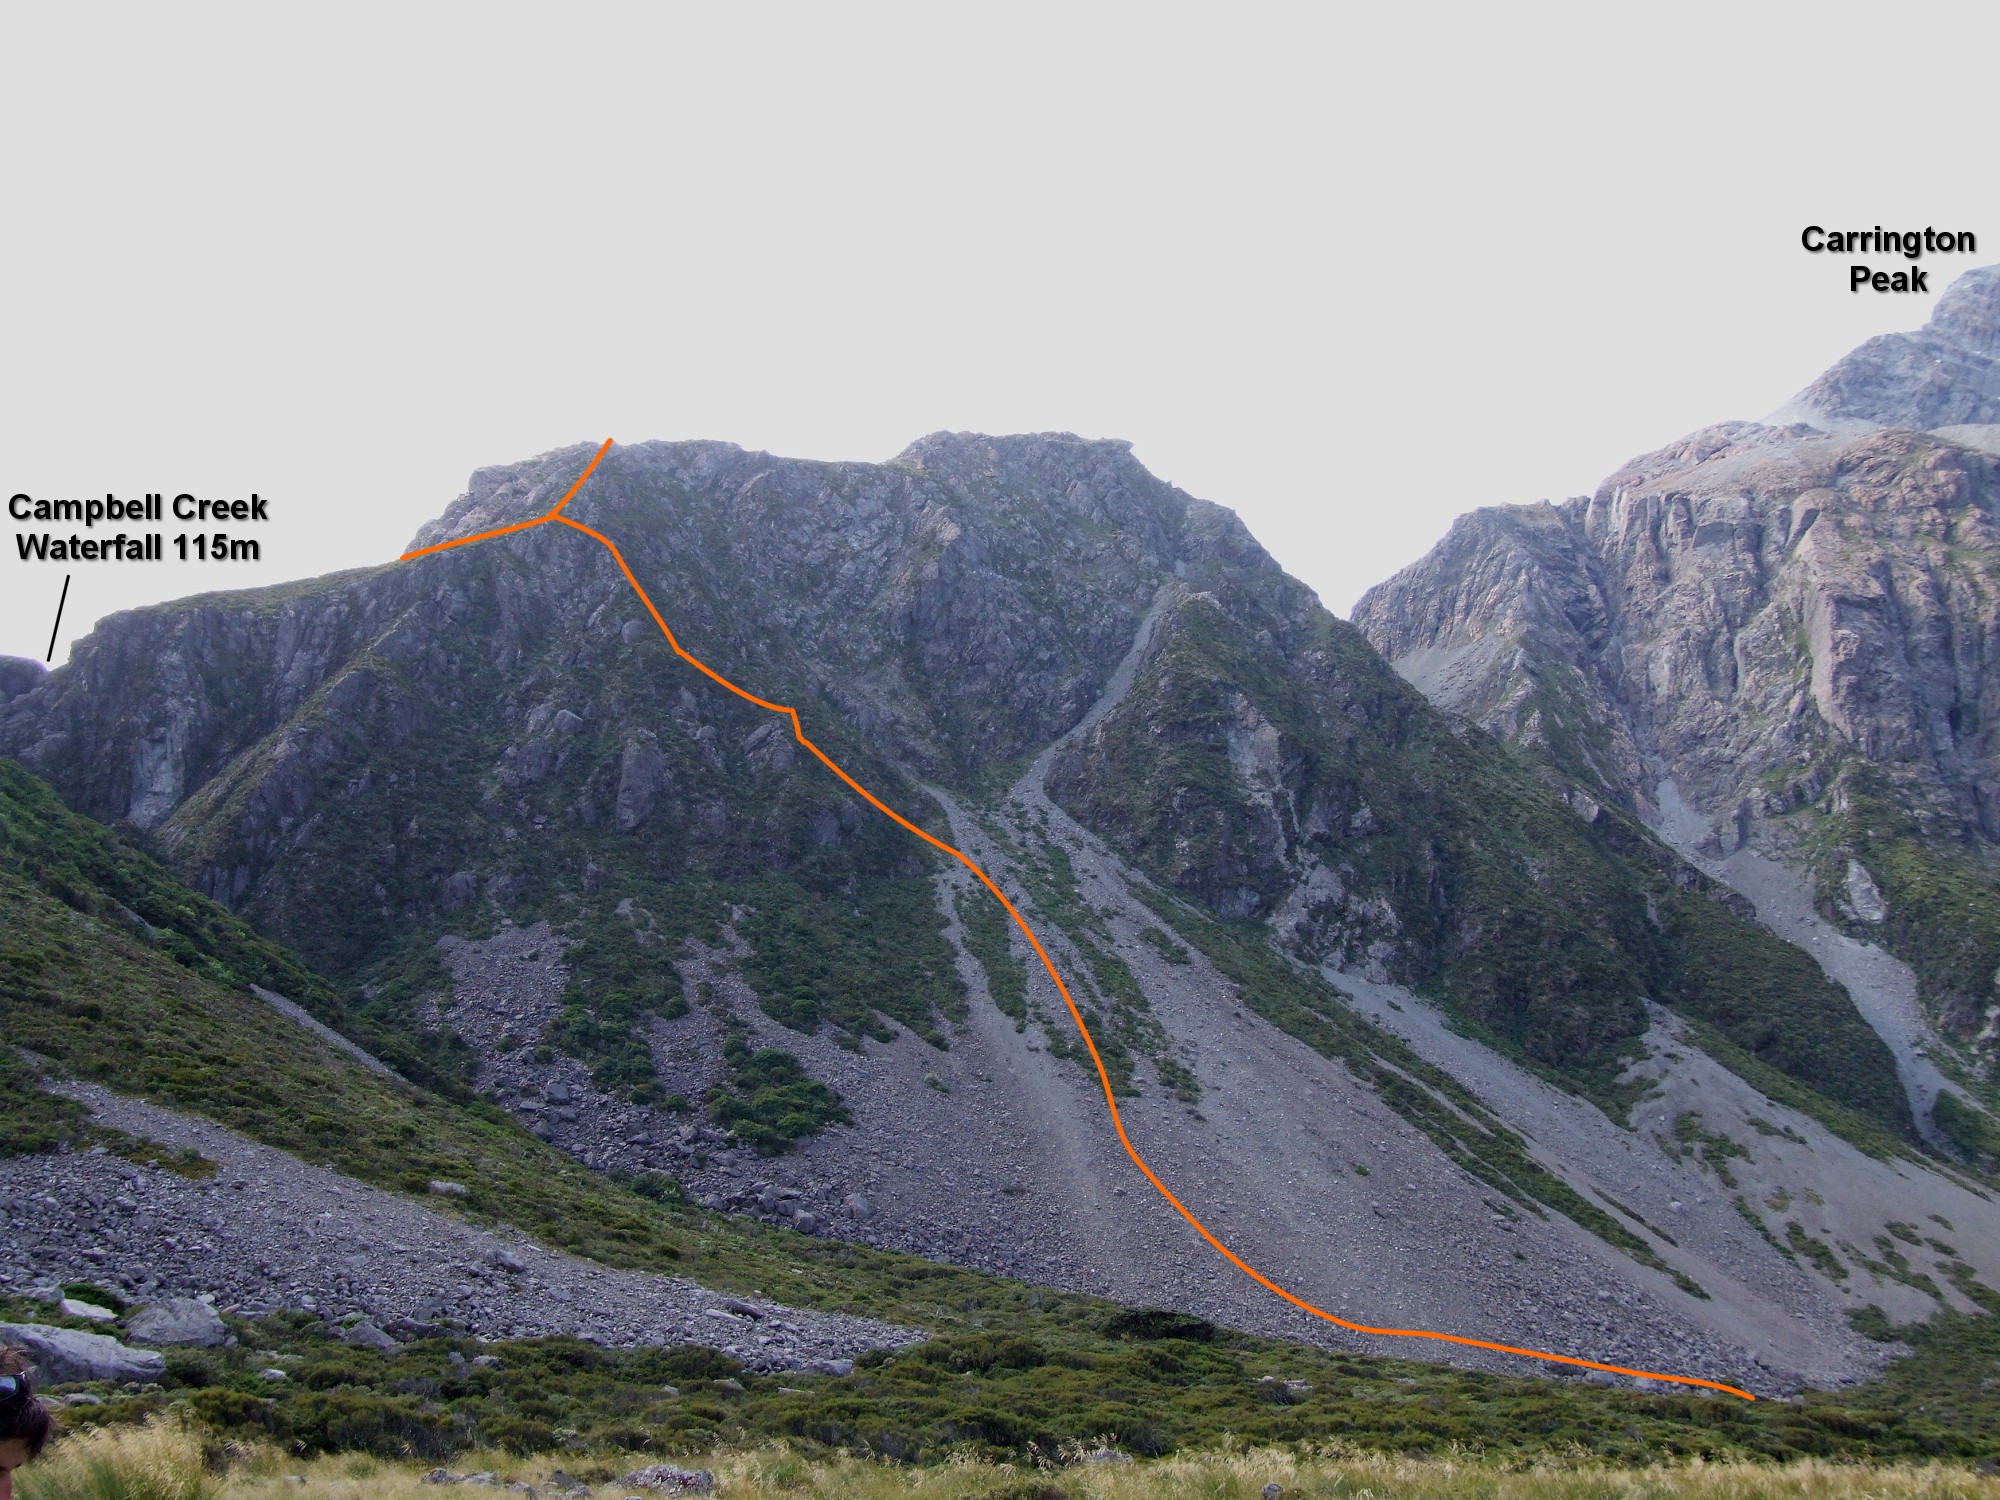
Campbell Pass - Waimakariri River
Mt Stewart (1934m) Guinevere Traverse
NZAC Grade 3 Seriousness III
From the summit of Guinevere follow the ridge-line heading southwest. After the reaching the 1994m point on the ridge a steep down climb follows on exposed, rotten rock, which involves finding a route through various steep gullies and rock obstacles before arriving on slightly easier, but still loose, terrain below.
Continue to the follow the ridge in a southerly direction until you reach the 1918m point on the ridge.
At the 1918 point you have two options:
1. Either continue over the top of the 1918m point, before dropping down onto the dangerously loose and exposed southeast ridge. This section of ridge ends in a steep 70m rock step which can avoided by down climbing a steep gully on the eastern side of the ridge taking you to the scree slopes below. From here sidle around the rock step then regain the ridge in the col between the rock step and the summit of Stewart.
2: Just north of the 1918m point you drop down onto the eastern scree slopes and sidle around in a southeast direction past the 1918m point and continue under ridge line, before regaining the ridge east of the rock step in the col before the summit of Mt Stewart.
From the col climb west up through lines of very good orange rock before finally reaching a final section of shattered, rotten rock that takes you directly to the summit.
Descent: From the summit descend via the northeast ridge as far as possible before dropping onto the scree slopes northwest of the ridge. Follow the scree slope down in a northeast direction to where it meets a broad tussock covered ridge. Follow the broad ridge sweeping around and down in a southeast direction. At the tree-line descend the steep bush covered spur heading east, keeping to the true-left before you find a scree chute than joins onto the main scree gut that can be followed all the way down to the Crow River. Beware hidden bluffs and cliffs whilst descending the spur.
Surveyed by Dave Hegan 18 January 2020
Note: This route has had ascents in the past but undocumented.
Mt Stewart - Guinevere Traverse
Mt Armstrong (2110m) Southeast Spur
NZAC Grade 2+ Seriousness II
At the head of the Rolleston River make your way up through the rock buttress on the true-left of the river to gain access to the Southeast Spur, from here follow a line of good rock that takes you up to the 2010m point of the east ridge. The East Ridge can be followed all the way to the summit of Mt Armstrong. Starting as a broad ridge at 2010m, the east ridge progressively narrows until it involves climbing around some loose pinnacles of rock with a decent amount of exposure on both sides, before broadening out again just before the summit.
Dave Hegan 10 January 2020
Mt Armstrong - Southeast Spur
Mt Wakeman (2271m) North East Slabs - Gingernuts
Ewbank Grade 15
To the (climber's) right of Hug-a-Ginga, starts up the vague crack/slab system slanting out right. Gear is generally plentiful, climbing very mellow. Easy climbing but on sometimes broken rock (Grade 14). From the base of the distinctive orange face with multiple vertical cracks, take the rightmost crack (or another, at probably a higher grade) then continue up balancey slabs on generally good rock to the base of the steep headwall with obvious big cracks (Grade 15/16 depending on crack taken at orange face). Move to the climber's right around the headwall and climb the slabs to the top of the bulge. From here scramble to the top of the outlier peak (Grade 14). If abseiling the route, note rap points carefully on ascent as good ones are hard to find (smooth domes of doom).
Sooji Clarkson & Eric Skea 21 October 2018
Mt Foweraker (1804m) Southeast Ridge
Note: Route 11.1 "East Ridge" in the 8th Edition Guidebook (p.90) should actually be "Southeast Ridge". The description remains unchanged.
Note: Route 11.1 "East Ridge" in the 8th Edition Guidebook (p.90) should actually be "Southeast Ridge". The description remains unchanged.
Mt Stuart (1906m) Southeast Face (190m)
Grade 2 (Summer route only)
The southeast face is reached by traversing over Phipps Peak, and the 1820m point, or by sidling into the col between Mt Stuart and the 1820m point from Pegleg Creek. Ascend the scree slope from the col towards a left-trending ramp of rock and scree at the bottom of the rock face. Ascend this ramp upwards then traverse off right to join the hanging scree slope. Climb to the head of the scree under a vertical gully.
Ascend the obvious, diagonal, left-trending ramp until you reach a rock ledge. From here there are multiple routes up to the South Ridge of Mt Stuart that involve climbing straight up steep, but solid rock, or working your way up through various ledges and chimneys, skirting around patches of scree and/or rotten rock as you go.
Once the ridge is gained continue on to the summit.
Dave Hegan, Hanno Snyman, Robert Phillips & Jun ?, 6 February 2018

Mt Stuart - Southeast Face
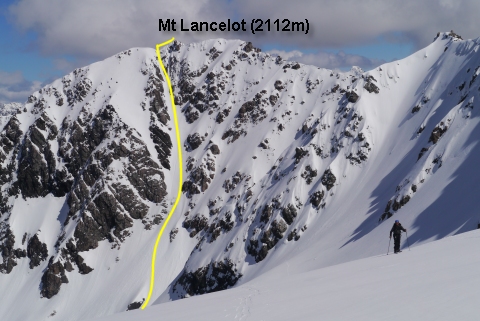
Mt Lancelot (2112m) Northeast Couloir (200m)
Grade 2- (Winter/Spring route only) BCS 3/4
Ascend Jellicoe Ridge route (5.4) from the upper Crow Valley until the basin northeast of Mt Lancelot is reached at about 1750m. From here the couloir is obvious, leading directly to the summit ridge and is straightforward to climb on 40-45º compacted snow, topping out approximately 10 metres southeast of the summit on 50º snow/ice. The summit can be reached from here by following the ridge on the Waimakariri side as the ridge itself is narrow and can be corniced.
A descent can be made by following the north ridge (Jellicoe Ridge) back to the head of the northeast snow-slope (route 5.4), avoiding any difficulties by travel on the Waimakariri side, then descending easily to the Crow Valley. A descent of the northeast couloir can be made on skis or snowboard in good snow conditions.
This route and the northeast snow-slope can be threatened by avalanche activity. Potential rockfall & ice shedding into this couloir is possible with day warming. In summer this route becomes an ugly loose rock chute.
Mike Wigley, Ash Rogers, Eric Skea, Mark Yungnickel, Byron Harvey, Jovan Andric, Lee Burbery & Ryan Nicol. Snowboard descent by Mike Wigley & Ryan Nicol. 30 September 2017
Mt Lancelot - Northeast Couloir
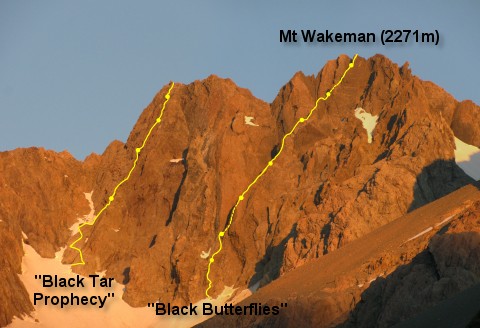
Mt Wakeman (2271m) West Face
"Black Tar Prophecy" (280m)
Ewbank Grade 13/14 (Grade 3 Summer route only)
This route is accessed via from Denas Creek, from the upper Wilberforce River.
The route starts near the northern edge of the west face and heads up directly to the northern outlier peak (2210m) of Mt Wakeman. The route involved an exposed scramble (Grade 2) for approximately 80m before 5 pitches over approximately 200m. The first two pitches consist of grade 12 rock with lots of scree ledges.
The climbing and rock quality improves higher up route consisting of steeper, weathered and compact sandstone around grade 13/14 with lots of exposure on pitches 3 and 4. The final pitch (5) is over loose blocks to the summit of the northern outlier peak (2210m) of Mt Wakeman. Rock protection along the route is spaced but sufficient. The true summit of Mt Wakeman (2271m) is an easy snow plod across the neve that feeds the White Glacier.
The route may be climbed from a camp near the head of Denas Creek, this necessitates a descent back to the camp. This descent involved a traverse along the Mt Wakeman - Mt Murchison ridge to a notch and access to the snowfields at the head of Denas Creek (safe ground). Descent into the notch required a 45m abseil off the ridge on the White Glacier side of the ridge.
Ryan Nicol & Ellie Watson, 1 January 2016
Climbers Notes: We carried twin 60m ropes and found a full set of camalots (0 to 3), a set of nuts and a couple of knife blade pitons particularly useful.
Mt Wakeman (2271m) West Face
"Black Butterflies" (320m)
Ewbank Grade 16 (Grade 3+ Summer route only)
The route starts roughly near the centre of the face before heading up a buttress and on to a prominent rib that runs diagonally up the face from left to right, topping out almost directly at the true summit of Mt Wakeman (2271m). A bergschrund may create issues later in the season.
The 1st pitch consists of a good compact sandstone face between a a shallow gully on the left and a larger gully on the right and is 60m long (grade 16). This pitch ends on a large belay ledge. Pitch 2 follows a slabby rib toward the buttress on good rock and is also about 60m long (grade 10-11). The 3rd pitch leads up behind the buttress into a corner before breaking out (crux grade 16) to the left and up on to the prominent rib feature (60m in length).
Pitches 4 and 5 follow the rib feature up sections of good rock sections of broken rock (up to grade 12) to a large belay ledge (approx 60m each). From here there are number of options for the upper part of the climb. Good rock exists on the impressive aretes visible on the ridge line although the climbing steepens dramatically here and it appeared that the climbing grade would also increase. Choosing to continue up the rib feature through 2 pitches (6 & 7) of deteriorating rock (up to grade 12) around 50m each. The final pitch (8) leads up and over the top of the rib feature on absolute choss to the summit ridge. Fortunately this pitch was short, around 15m in length.
From here the summit approximately 20m to the south and is a short easy scramble.
Descent is the same for "Black Tar Prophecy".
Jason Marshall & Ryan Nicol, 7 February 2016
Climbers Notes: We used double 60m ropes and carried doubles of cams (0 to 3) and a set of nuts. We found this to be more than sufficient rock protection for the climb. A smaller rack could be used but doubles of smaller cams 0 to 0.75 would be useful.
Mt Wakeman - West Face

Ellie Watson on pitch 3 of Mt Wakeman's "Black Tar Prophecy"
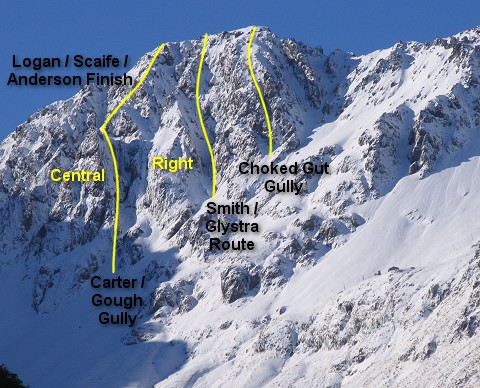
Mt Speight (2116m) Northeast Face Direct
Grade 4
The left of the two central gullies topping out directly on the summit. Four sustained pitches of WI3 (WI3+ crux) and 150m of moderate-steep snow gully. Minimal rock protection on lower pitches, with some pro found on the left shoulder of the upper gully. Pro: 8-10 ice-screws, Camalots 0.2-0.75, Wires 1-8, and 2x snow stakes.
Tom Botterill & Michael Eatson, September 2015

Mt Speight - Northeast Face
NOTE: Mt Foweraker was officially named in 2015. It is located on the ridge south of Sudden Valley Stream (E1493767 N5241310). Although it would have had ascents as part of traverses etc none have been documented.
Mt Foweraker (1804m) Northwest Ridge
Grade 1- Summer route only
Head up the stream that joins Sudden Valley Stream on the true-right about 500m downstream of Sudden Valley Biv. Travel up this stream is quite straight forward, no waterfalls etc, but a bit rough and slow in its lower reaches. The stream splits at 1100m, follow the south branch to about 1300m then start ascending the spur that leads to pt 1447m. Some avalanche risk may exist from the basins above! From here follow the broad ridge SSE over pt 1711m and then south to the summit.
Surveyed by Daryll Thompson & Stuart Columbus, 16 April 2015
Mt Foweraker (1804m) North Avalanche Chute
Grade 1- Summer route only
Ascend the Sudden Valley Stream for 4.2km from its junction with the Hawdon River to the obvious avalanche chute running north from Foweraker's west ridge (E1494897 N5242371), it is full of tree debris. Ascend the creek associated with the chute to where it gorges and climb the true-left spur ascending easily through beech forest. Once in open ground aim through the alpine scrub to the isolated stand of beech above and move true-right onto the very loose scree directly under the summit, easier travel is afforded by gaining the rocky spur on the true-right part way up. Ascend easily to summit. Note: In winter this route is fully threatened by large avalanches!
Surveyed by Tyler Brummer & Graeme Kates, 21 March 2015
Mt Foweraker (1804m) East Ridge
Grade 1-
From Hawdon Shelter cross the Hawdon River to the true-right bank and make your way to the electric fence that crosses the terrace before Sudden Valley Stream. Where the fence meets the toe of the east ridge start bashing your way uphill utilising trapping lines where convenient. From the 1035m knob continue pushing through extensive beech regen, attempting to stay on the brow of the ridge and following deer trails. The route becomes less scrubby at the 1158m point. Continue following the ridge through varying ground, there is some loose rock scrambles before the 1720m point. The ridge is about 4.4km long. Note: In winter there may be issues with cornices and avalanche terrain about its upper flanks!
Surveyed by Tyler Brummer & Graeme Kates, 21 March 2015
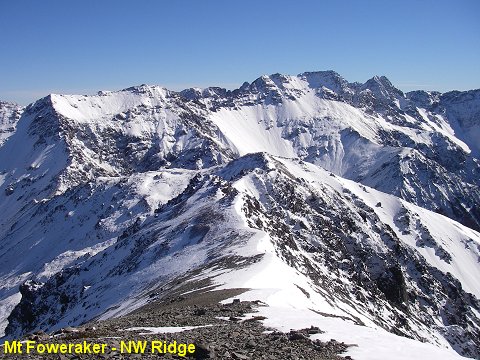
Mt Foweraker - Northwest Ridge
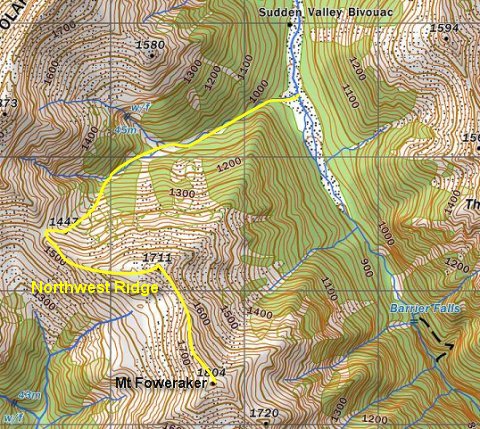
Mt Foweraker - Northwest Ridge
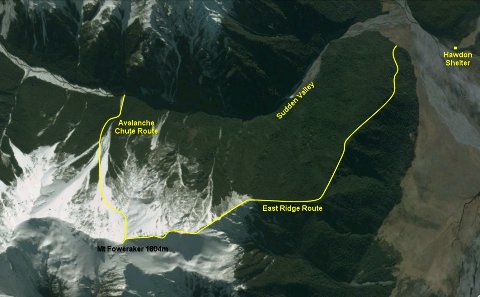
Mt Foweraker - North Avalanche Chute & East Ridge
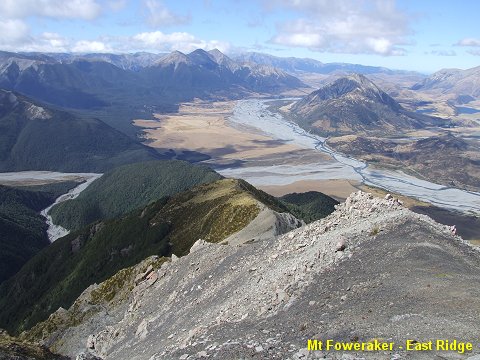
Mt Foweraker - East Ridge
Cow Peak (2022m) SE Face
"Greet the Sacred Cow"
280m Ewbank Grade 14 (2+) Summer route
This route is accessed from the Anti-Crow Valley and starts at the toe of the obvious buttress in the centre of the face.
The route heads up roughly the centre of the buttress (more sustained options could be in the extreme left of the buttress) to the top of it where it ends in a rock arete opposite the large notch in the ridge line between Gizeh Col and Cow Peak. The notch is avoided by following the arete towards the notch and turning north to follow slabs and then a gully to the summit ridge roughly 100m south of the summit proper.
The rock is surprisingly good with comfortable belay ledges at the top of each pitch. The seventh and final pitch to the ridge is a bit chossy but is manageable.
Descent is via Cow Peak ridge to Fools Col and back to the head of the Anti-Crow.
We used a a single 60 m rope, a full set of nuts, and found Camalots 1 through to 3, a set of hexes and 3 - 4 slings to be useful.
Ryan Nicol & Ellie Watson, 24 January 2015
Note: This buttress may have had previous ascents; if you are aware of any such ascents please contact me!
Phipps Peak (1965m) South Ridge Slabs
"CFS - Chronic Freezing Syndrome"
140m Grade 14/15 (Summer route)
Start in the gully between the two slabs and scramble up the low angle terrain tending right for about 45 m until reaching a small gravel ledge. Pitch up the center of the face. First pitch grade 10 - 12 on solid rock with limited gear. Second pitch tend left following a large crack. At the end of the crack traverse briefly left to the arete to avoid loose rock. Head up the arete to the base of a loose gully with a small roof to your right. Pop onto the roof (crux, grade 14/15) and summit. Good quality, solid rock (for Arthurs Pass) the whole route. Summit Mt Temple then descend via the normal descent route (6.14).
Note: We used a single rack of nuts, tri-cams and cams (000 - 3 camalots). An extra one or two #3 camalots (or equivalent) would have been nice to protect the long crack on pitch 2.
Terra Dumont & Matt Hanson, 26 April 2014
Note: This buttress has had previous ascents however the precise details of any route are not known.
Mt Temple (1913m) Temple Buttress
"Carter / Gough Gully"
Ungraded (winter route)
This route starts directly below the major incised gully between Central & Right Buttresses, but climbs the couloir that flanks the Central Buttress through steep terrain. In 1973 this route finished at the base of the broad gully ascending to the north ridge. In August of 1974 the route was extended by climbing the craggy spur to the south and subsequently to the north ridge of Mt Temple. Descend via the normal descent route (6.14).
Bryan Carter & Peter Gough 1973
Hugh Logan, Warick Anderson & Paul Scaife August 1974
Mt Temple (1913m) Temple Buttress
"Choked Gut Gully"
Ungraded (winter route)
Climb the steep, narrow couloir that ascends on the left of the descent routes ramp (6.14). The "choke" is midway up this couloir. 2/3 way up easier ground (spur) is met to the summit of Mt Temple. Descend via the normal descent route (6.14).
Hugh Logan & Wilf Lammerick July 1972
Mt Temple (1913m) Temple Buttress
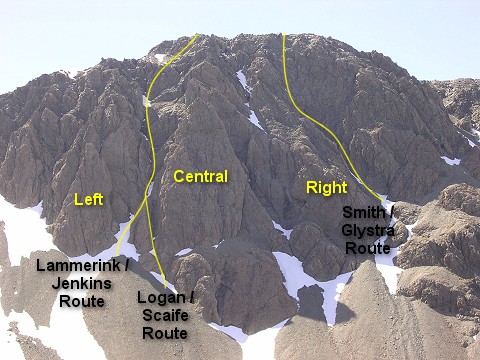
"Lammerink / Jenkins Route & Logan / Scaife Route" (see also "Temple of Doom" below)
Grade 2+ (winter 200m)
The Lammerink / Jenkins start climbs the obvious deep gully between Left & Central Butresses; the Logan / Scaife start climbs the slab and splinter gully out to the right. Both join and follow the major gully, tending left at the gully conflence, then climbing the lesser slopes to join the north ridge of Mt Temple. Descend via the normal descent route (6.14).
James Jenkins, Wilf Lammerink, Hugh Logan & Paul Scaife 29/07/1973
Mt Temple (1913m) Temple Buttress
"Smith / Glystra Route"
Ungraded
Start 1/4 way up the normal descent route (6.14) taking the north sloping gully adjacent the right buttress. Climb the steep head-wall out of the gully, then easier ground to the summit of Mt Temple.
Andrew Smith & Colin Glystra 1973
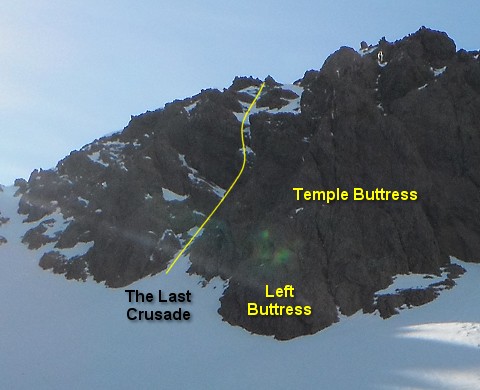
Mt Temple (1913m) Temple Buttress
"The Last Crusade"
Grade 2+ (winter)
This climb starts at the base of the second gut to the left of Left Buttress. Climb the gut through three pitches (150m) directly up onto the north ridge of Mt Temple. Good rock protection (stoppers and a few [tri]cams). Descend via the normal descent route (6.14).
Craig Hosking & Oliver Boyd 19/10/2013
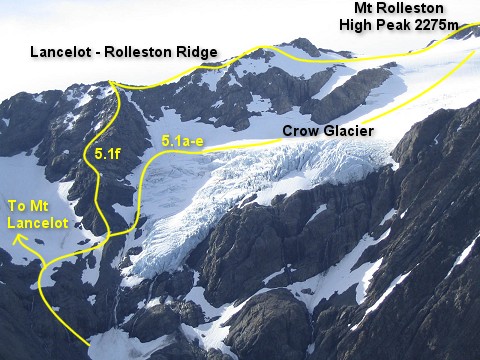
Mt Rolleston (2275m) - Glacier Spur Route
5.1f Grade 2+ (winter)
Initially follow route 5.4 towards the wide gully leading to Mt Lancelot however traversing true-left to the base of the prominent spur that flanks the true-right of the Crow Glacier (beware of avalanche terrain). Follow the spur-crest in winter over mixed conditions on 40º terrain with some steep ice pitches about the mid-way point, the angle eases as it approaches the Lancelot-Rolleston Traverse, follow the ridge traverse until you can drop into the neve of the Crow Glacier continuing towards High Peak (2275m) ascending routes 5.1c-e to the summit. This route is not recommended in summer as it consists of extremely loose rock.
Richard Strong & Mattie Scheider Aug 2008
Mt Oates (2054m) - Southwest Spur Routes
8.4a "I may be some time" Grade 2+
Gain the southwest spur at it's toe or at half-height using snow/scree slopes and easy scrambling on the right. Above half-height is a fantastic defined rib with easy climbing but terrific exposure. The final section of the spur steepens, with a couple of 5m vertical steps that can be climbed in one 60m pitch. From the top of the pitch it's 30-40m scramble to the summit. Overall the rock quality is good, apart from a couple of loose sections during and above the top pitch. A confident party could solo until the final pitch but simul-climbing until the final steep section suits the lower route.
Rob Frost & Claire Gibb 11/12/2011

Image by Yvonne Pfluger
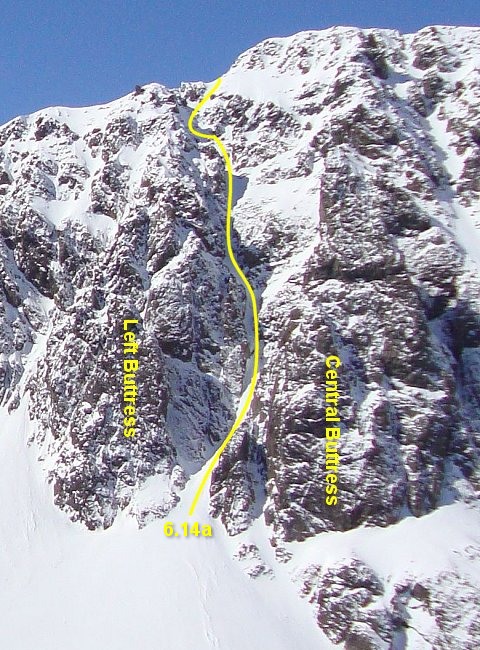
Mt Temple (1913m) - West Face Routes
6.14a "Temple of Doom" Grade 2+ (winter 200m)
Start up the couloir between the Left Buttress and Central Buttress and over a short section of 70 degree thin waterfall ice at one third height with a couple of mixed moves. Stay right when the couloir branches and continue up a short rock step with a skinny seam of ice at two thirds height. Follow easy snow to the ridge.
First Ascent - James Jenkins, Wilf Lammerink, Hugh Logan & Paul Scaife 29/07/1973
Description by Alex Geary 27/9/2011
6.14b "Normal ascent/descent gully"
Grade 1- (220m)
This is the broad gully to the true-left of Right Buttress. In summer beware of loose rock and in winter avalanches. Towards the top follow ramps to join the main south ridge.
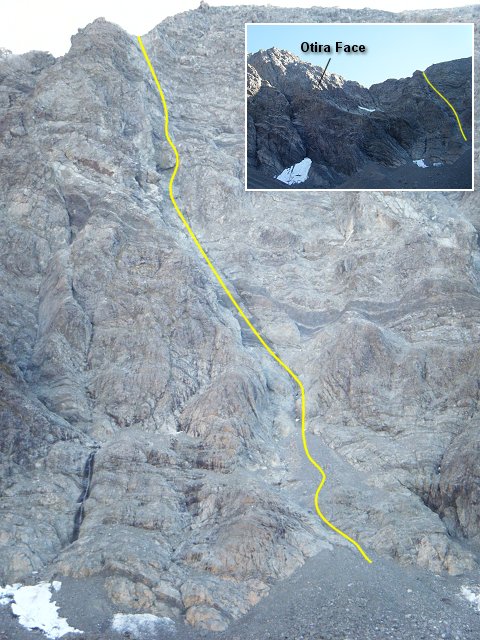
Mt Rolleston (2275m) - "Headstone Gully" 250m
Grade 2+
The route follows the gully to the right of the access for Central Direct (Mt Rolleston -Otira Face). Climb to the top of the scree slope at the base of the climb and join the gully from there. The climbing on the lower half of the route is on reasonably solid rock and is relatively straightforward. The rock gets looser as you approach the prominent overhang/ roof at about 2/3 height, there is possibilities for good anchor on right hand side of overhang (small cams helpful e.g. .5 camalot and smaller). Climb around overhang via weakness on wall at right side (crux), this section is tricky but is protectable and leads to easier ground. A couple of short scree tiers lead to the final gully system. Climb these gullies to the ridge top. The top gullies are insecure and offer limited chance for protection. Climb to summit via Philistine-Rolleston Ridge.
Matt Sheat & Alan Haslip 30/4/2011
Mt Wakeman Northeast Slabs - "Hug A Ginga"
200m Ewbank Grade 15
This route is near the Barker Hut. Located at the north-eastern end (lowest point) of a outlier summit (2189m) on the Northeast ridge of Mt Wakeman (2271m). This 200 metre high, orange coloured triangle shaped buttress can be seen directly out of the west-facing window of Barker Hut. Walk for about 30 minutes from the hut up towards the Marmaduke Dixon Glacier. The climb starts once past some steep, smooth rock with vertical cracks (good options also) and then a broken, rust coloured gully. Climb up slabs with short steep sections for two pitches (grade 15 with good protection), then easier climbing up to grade 14 through fantastic orange rock for another three pitches. Either scramble up from there to the outlier summit, or angle easily down a scree ledge system back into the basin opposite the Marmaduke Dixon Glacier.
John Price & Paul Hersey 27/11/2010
Anti-Crow River - "Whale Rock Crag" (951m)
Whale Rock Crag is located 1.9km west of Anti-Crow Hut on the true-right of the Waimakariri River (BV20 E1476799 N5238554). Access is very straightforward; descent off all current routes is by abseil (50m). The crag offers nice slab and shallow crack climbing with low grades. The setting is very beautiful and it escapes some of the Main Divide weather. The lower routes are surprisingly sheltered from the wind.
"Bellbird" 40m Ewbank Grade 14
Pitch 1 (15m): Start on the bushy lump 10m left of Shallow Splendour. Climb a few crumbly metres to the left trending crack, follow this up to ledge and belay.
Pitch 2 (25m): Climb left up good looking crack through steep section and easily out to bush belay.
Aaron Gillespie
2009
"Shallow Splendour" 45m
Pitch 1 (15m) Ewbank Grade 17: Start on left side of main base area. Up and 2m across sloping ledge. Straight up cleaned cracks to belay off bushy ledge.
Pitch 2 (30m) Ewbank Grade 7: Climb in almost any direction from bushy ledge to the top.
Aaron Gillespie
2009
"Ataxia" 45m
Pitch 1 (15m) Ewbank Grade 16: Start up and right of Shallow Splendour, follow right hand side through bulge and up to top.
Pitch 2 (30m) Ewbank Grade 7: Climb in almost any direction from bushy ledge to the top.
Adele Reweti
2009
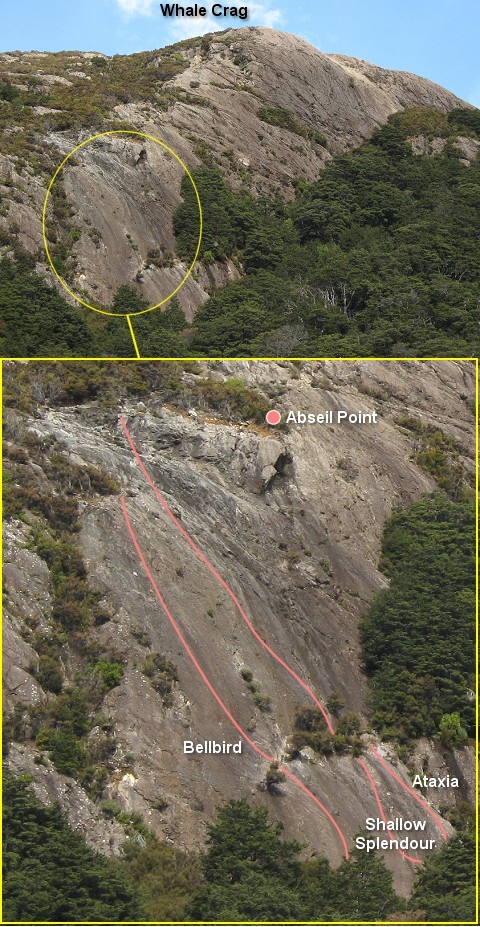
Mt Aicken (1867m) Graham Stream - "No Pant's Nathan"
60m WI4
Located in the north branch of Graham Stream (BV20 E1484326 N5244372). Accessible from above via scree into head of stream from the Mt Aicken track, or from below via Graham Stream. Waterfall ice normally begins to form here in late May / early June, though can be very short lived. Further information to come.
Gideon Geerling & Jim Masson
June 10 2009
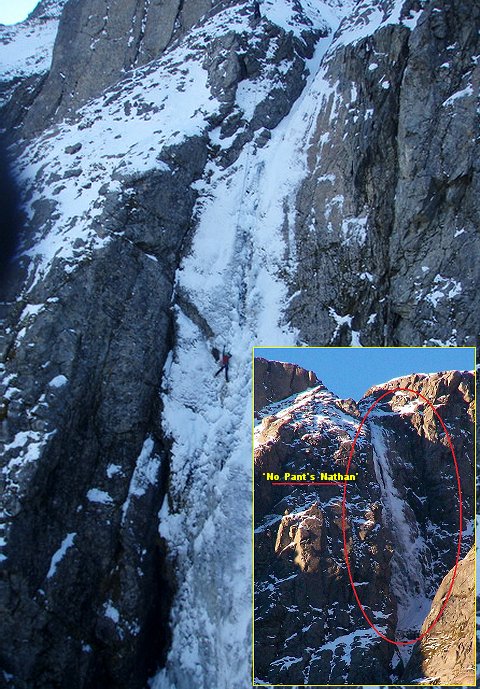
Mt Harper (2222m) - 1.12 NE Ridge Slabs
Ewbank Grade 17
Approach to these slabs is across the permanent snowfields underlying the north ridge of Mt Speight (2116m) then onto the permanent snowfield under the southeast flank of Mt Harper (2222m).
Both of the routes shown commence near the toe of a rock slab comprising "solid" gritstone and follow weaknesses in the face.
The face is about 70 metres at highest point and 15-20 metres across. There is potential for a couple more routes on the face. 60 metre ropes are good, a set of wires with doubles of mids and a handful of cams should see you right.
Left hand route climbs on the face to the right of the arete. Good gear can be found on the face through cracks and breaks. 50 metres of interesting climbing on good rock.
J Dempster & A Gillespie
13/12/2008
The right hand route starts near the centre of face; head up and slightly right following gear to about the middle of the face. Straight up from here. Good gear but a bit spaced at times. 55 metres.
A Gillespie & J Dempster
13/12/2008

Mt Speight (2116m) - Harper Creek - NE Ridge
Ewbank Grade 12
This route has had several ascents over the past decade; though its first ascentionists have not been recorded.
Head towards the basin below the NE face routes. Ascend rock slab on far left which leads to main north east ridge. From here the ridge steepens to a short 10-15 metre pitch (Grade 12). Above is a nice red arete, follow until broader easier ground to loose rock for the final 50-80m to the summit. Descend normal route (North Ridge).
Surveyed by J Dempster & A Gillespie
14/12/2008
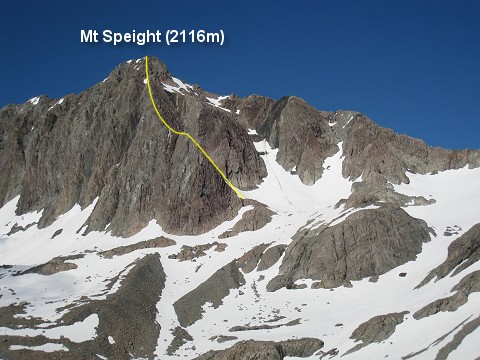
Waimakariri Col to Mt Philistine to Otira Valley
Variation to Philistine Traverse Grade 1+
This route is included to clarify "tramping" information contained in other recent publications. Please note I would not consider this a tramping route, given the terrain (especially in winter) and potential navigation problems.
From Waimakariri Col sidle around on screes/snow-slopes gaining height to the base of a narrow couloir that joins the Philistine - Rolleston Ridge out to the north side of the scree fan (these slopes can be avalanche prone in winter, crevasses form here in late Spring). This 80m gully contains extremely loose rock in summer, or hard ice in winter. Once on the ridge you travel towards Mt Philistine, all major ridge obstacles (gendarmes) are bypassed on the Rolleston River side (some may require you to drop 50-100m from the ridge). Once on Mt Philistine you descend the scree/snow-slope to the hanging valley that runs down the left side of Philistine's east ridge (this ridge forms the escarpment into the Otira Valley), Route 6.8. This route may have rock cairns to the edge of a 150m cliff that descends to Warnocks Knob. There is a zig zag route down through this bluff that is generally a scramble, keeping away from bluffs & cliffs (if you slip or fall, there is nothing to stop you to the bottom). It should not be attempted in wet or loose snow/ice conditions. From the base of the cliff you descend the scree to the foot-bridge in the Otira Valley.
Graeme Kates
2008

Mt Alexander (1958m)
This route is in Otira-Kopara Conservation Area, included here as not in any other climbing guide.
12.11 Camp Creek (West Ridge) Grade 1
This is the "normal" approach route to Mt Alexander. From Jacksons on Hwy 73 turn into Lake Brunner Road and follow to the Camp Creek bridge (12.7km), a DOC sign marks the access road to the car park (170m ASL) on the northern side of the bridge. Follow the tramping track up Camp Creek, a landslide will shortly force a double crossing of the creek, then the track commences its steep climb above the canyon. The track sidles back to the upper creek, then crosses it, reaching the sign-posted junction to the Camp Creek hut (6 bunks) after 300m. Time to the hut is 2 - 3 hours from the car park.
From the junction (730m ASL) follow the marked track, it crosses two creeks then commences its steep ascent on a Rata clad rock rib towards the obvious rock tors on the main ridge. At treeline the route is marked by poles. The poled route is easily followed to the 1795m mark. Time to this point is about 1.5 - 2 hours. Beyond this point the ridge becomes narrow, loose, and steepens with some gendarmes that can be bypassed on either side. Time to the summit is a further 1 - 2 hours. The hut is commonly used as a base for this climb. In winter avalanche risk exists on all flanks of the Alexander's west ridge. Heavy rain makes Camp Creek and its tributaries uncrossable.
First ascent not recorded
Mt Alexander (1958m)
This route is in Otira-Kopara Conservation Area, included here as not in any other climbing guide.
12.10 SE Ridge Grade 1+
There is no easy way to approach this ridge, the full flow of the Taramakau River (includes the Otira River) must be crossed in one or two channels, then a west coast scrub bash ensues to gain the upper ridge, from either the true right spur adjacent the creek draining the Mt Howe basin, or an obvious diagonal fault scarp about 200m further downstream. Either way there tends to be some steep, slippery terrain hidden in the beech forest. Once treeline is reached travel along the wide open ridge is easy. Steepening rock is encountered about 300m short of the summit, in winter the snow/ice allows fairly easy travel (beware of cornices!), in summer expect loose, gruddy rock. An alternative is to track west under the ridge rocks using a series of interlinked scree/snow gullies that lead to the summit, this makes an easier descent route (take care in winter as these are also avalanche paths).
Graeme Kates
9 September 2007
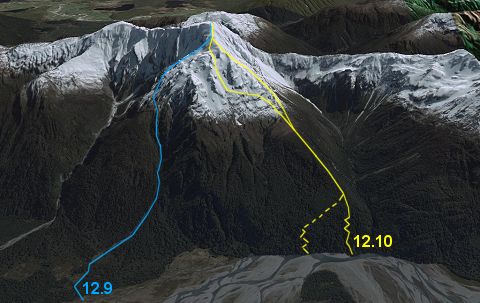
Mt Franklin (2145m)
9.14 SE Face "Way Down Sally" Route Grade 5- (8 pitches)
Take the narrow couloir that starts on the right hand side of the main buttress in the centre of the face. Ascend 3 pitches to the snowfield at mid-height. Trend left up the snow field for 1 pitch to the rock rib. Follow the gully to the right of this onto the upper snowfields. The route joins the South Ridge (8.7) approximately 75m to the SW of the summit. Descend via the South Ridge.
Don French, James Wright
22 October 2006
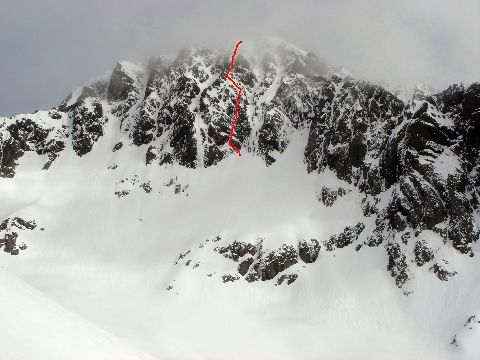
Mt Damfool (2030m)
1.12 The Sunglasses Route Grade 2+ (Rock crux: Ewbank Grade 12)
This nine pitch route starts on the extreme right hand end of a large and obvious bench accessed from basin above the waterfalls at the head of the Anti-Crow River. It then follows through a short steep section then follows slabs angling left until on the main arete. The rock is excellent; compact greywacke, great friction, but sparse protection available. From the top of the arete the route follows an easy but broken ridge over a short step to main summit.
Andy Cole & Paul Stevens
14 April 2005
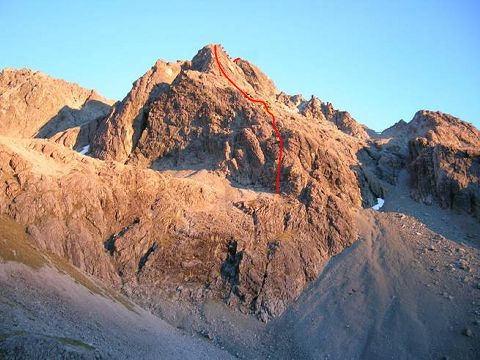
Mt Philistine (1967m)
6.9h The Bone Collector Grade 4+/5
(Rock or Ice)
Follow faint buttress line diagonally right through mixed ground for 5 pitches, traverse left at a short wall and up a short couloir to climb steep ice covered slabs and then head diagonnally right over exposed mixed ground to a short 4m wall ( extremely loose rock), climb delicately over this to reach steep snow at first and then onto the main snowfield below Mt Philistine. Return via route 6.8.
Gerard Smith & Brian Alder
July 2002
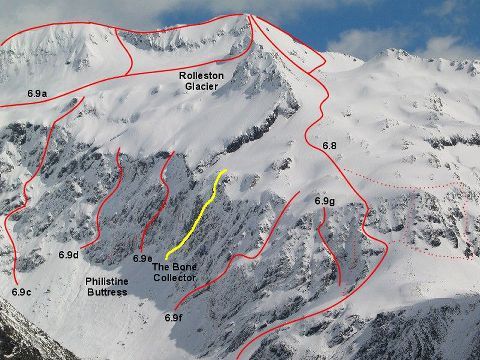
Otira Slabs - Otira Valley
There has been a flurry of climbing on the Otira Slabs recently, hence a web of new climbs covers the face. Still waiting on descriptions, names and grades for many, I will update these as they come to hand.
"Sonam"
1st pitch (Ewbank Grade 15) 45m - Belay on the higher ledge and head up and right. Straight up through the scrappy section then into a prominant crack that takes good gear.
James Dempster & Hamish Reid
December 2003
2nd pitch (Ewbank Grade 15) 25m - Start near middle of wall and head slightly left. Poor pro.
David Livingston & James Dempster
January 2005
"Fly My Pretties" (Ewbank Grade 16) 48m
Traverse along the ramp then straight up. Crux is near the top. Good gear placements but requires a bit of a clean. Good anchors at the top. Scramble up and belay on the obvious ledge or you'll run out of rope!
James Dempster & Sarah O'Donohue
December 2004
"Kea Kindergarten" (Ewbank Grade 14) 25m
Right trending weakness to the right of the 2nd pitch of 'Sonam'. Well featured and good placements for large wires/small hexes and mid range SLCDs.
Hamish Reid & David Livingston
April 2005
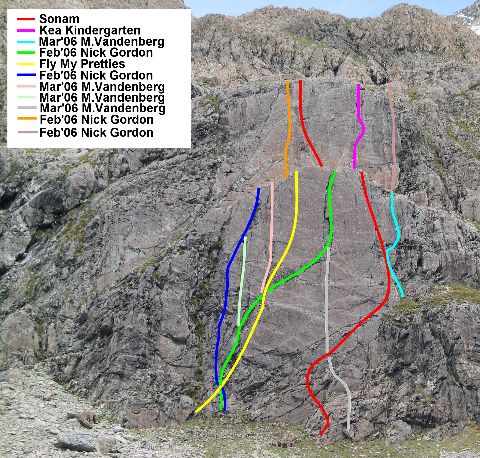
Castle Hill Peak (1998m) - Descent/Ascent variations
For those that have wandered up Routes 13.21 or 13.22 to Mt Plenty (1459m) and then carried onto Castle Hill Peak (1998m), there is a multitude of traverses that lead back down into the Ghost Creek catchment. Prefered season is winter when snow/ice is glueing all the loose grud together. From the summit of Castle Hill Peak continue north to the minor summit (1941m) then turn north west and follow the obvious ridge that descends on the true right of the Ghost Creek catchment. To carry on along the north west ridge leads to various easy descent paths into Ghost Creek. At a point (E2409672 N5772604) a spur departs westwards, this is the most "adventurous" route, it enters beech forest, stay on the ridgeback initially but as it narrows keep towards the true left near a very steep escarpment into Ghost Creek, to carry on to the nose of this ridge will require 2 ropes and slings for trees to descend it's cliff, however about 250m prior to the cliff near point (E2408472 N5772464) a steep and winding couloir descents directly through the bluffs to the head of a scree in Ghost Creek, it requires snow/ice (non-avalanche) and crampons to be worn to make it safe (would be nasty if snow-free). Enter it via the secondary gully a few metres uphill to avoid its vertical lip.
Graeme Kates & Pavel Sedivy
July 2007